Automation in Ardour is a very broad, yet very important topic. It's particularly broad because, on a track, you can automate almost any parameter you choose. And it's very important because you will, without a doubt, use some sort of automation in every Ardour project you create once you understand the power and potential automation has.
So what is automation? Automation allows the user to control specific parameters of a track on the fly and during play for a particular track. Any automation recorded to any parameter of the track will be saved and repeated every time that track is played. In other words, automation allows you to automate changes to certain parameters as a track plays, allowing Ardour to do some of the heavy lifting in your track for you, once you've recorded what you want the automation to be.
The questions still remain: what parameters of the track can we automate and how do we set up this automation?
Well, the cool part about automation is that you can automate almost any parameter in the track. You can automate the Fader and Panning, which are very common automations that will happen on almost every track. You can even automate the Send on a track to send more or less signal to a Bus it's routed into. Plugin Parameters can also be automated, which opens up a whole world of complex and exciting possibilities for automation. In that regard, your options are nearly limitless.
Let's talk about setting up automation on a track. To begin, you'll have to select the track you want to automate. If you haven't set up automation on a track before, click the "A" button to the right of the fader. You'll be given a number of options, shown below, for parameters that you can automate. For this example, let's add some Fader Automation.
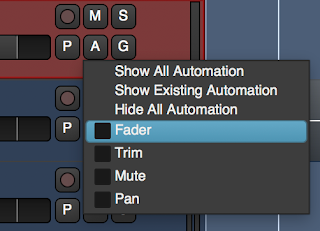
Once you click Fader, you'll be presented with a Fader Automation lane directly below your track.

Right now, you'll notice that the automation setting is set to Manual. That means there is no automation on this track, and the Fader is set to react to the manual level that the fader has been moved to by you, the user, on the fader slider.
To add automation, we need to change this setting, and we have two options we can use to do that: Touch and Write.
Write Automation is a way of recording automation on the fly while the track is playing.

When you set your automation setting to Write and play the track, any changes you make to the parameter you're automating (in this case, any changes you make to the fader) will be recorded and become the automation for that track. The next time you play the track, because of the automation, the same changes that you triggered manually as you were recording the automation will happen. And this time, they'll happen on their own!
One important thing to note is that Write automation mode will overwrite any automation you already have in place when you play your track, so be careful about losing your work! After you've recorded in Write mode, change your mode to Play or Touch mode, which will simply play your automation, to make sure nothing gets overwritten
Here's an automation curve for the fader that I recorded on a track in Write mode.

It looks a little strange, and I certainly won't use this automation curve for the final product, but I wanted to illustrate how easy it is to manipulate the curve simply by using Write mode.
Now we'll try using Touch mode to draw our own curves. To start using touch mode, make sure you have the Fader automation on your track set to "Touch" and select the "Draw" tool from the toolbar.


Then, simply click on the curve to add points which you can manipulate. Your finished project might look something like this.

Now this is not what I'll use for automation in my finished project either, but it shows the functionality well. Creating these curves is the way you program all automation in Ardour. And, like we said before, automation is a multifaceted concept.
Consider how the curve might apply to Panning automation, for example. The lower the point on the curve, the further left the audio will pan. The higher the point, the further right.
Plugins work very similarly when being automated. Let's say, for example's sake, we want to automate a single band on a multi-band Equalizer. The curve, in that case, would control that specific parameter, such as the frequency range being manipulated, or the level to which those frequencies should be manipulated. And the best part is, you can have as many automation curves as you want (or as any as your machine can handle!)
For the actual project we're working on right now, I've added an automated fade-in on one of the underlying MIDI tracks that makes up the harmonic structure of the song. It was too overpowering at the beginning, so I wanted it to slowly fade in as the beat picks up. It looks something like this...

The curve shown there gently fades the audio in after a few seconds, which sounds something like this...
And this is the same audio region with no automation, for comparison.
I hope this proves how powerful and multifunctional automation can be in keeping your tracks interesting!
So what is automation? Automation allows the user to control specific parameters of a track on the fly and during play for a particular track. Any automation recorded to any parameter of the track will be saved and repeated every time that track is played. In other words, automation allows you to automate changes to certain parameters as a track plays, allowing Ardour to do some of the heavy lifting in your track for you, once you've recorded what you want the automation to be.
The questions still remain: what parameters of the track can we automate and how do we set up this automation?
Well, the cool part about automation is that you can automate almost any parameter in the track. You can automate the Fader and Panning, which are very common automations that will happen on almost every track. You can even automate the Send on a track to send more or less signal to a Bus it's routed into. Plugin Parameters can also be automated, which opens up a whole world of complex and exciting possibilities for automation. In that regard, your options are nearly limitless.
Let's talk about setting up automation on a track. To begin, you'll have to select the track you want to automate. If you haven't set up automation on a track before, click the "A" button to the right of the fader. You'll be given a number of options, shown below, for parameters that you can automate. For this example, let's add some Fader Automation.

Once you click Fader, you'll be presented with a Fader Automation lane directly below your track.

Right now, you'll notice that the automation setting is set to Manual. That means there is no automation on this track, and the Fader is set to react to the manual level that the fader has been moved to by you, the user, on the fader slider.
To add automation, we need to change this setting, and we have two options we can use to do that: Touch and Write.
Write Automation is a way of recording automation on the fly while the track is playing.

When you set your automation setting to Write and play the track, any changes you make to the parameter you're automating (in this case, any changes you make to the fader) will be recorded and become the automation for that track. The next time you play the track, because of the automation, the same changes that you triggered manually as you were recording the automation will happen. And this time, they'll happen on their own!
One important thing to note is that Write automation mode will overwrite any automation you already have in place when you play your track, so be careful about losing your work! After you've recorded in Write mode, change your mode to Play or Touch mode, which will simply play your automation, to make sure nothing gets overwritten
Here's an automation curve for the fader that I recorded on a track in Write mode.
It looks a little strange, and I certainly won't use this automation curve for the final product, but I wanted to illustrate how easy it is to manipulate the curve simply by using Write mode.
Now we'll try using Touch mode to draw our own curves. To start using touch mode, make sure you have the Fader automation on your track set to "Touch" and select the "Draw" tool from the toolbar.

Then, simply click on the curve to add points which you can manipulate. Your finished project might look something like this.

Now this is not what I'll use for automation in my finished project either, but it shows the functionality well. Creating these curves is the way you program all automation in Ardour. And, like we said before, automation is a multifaceted concept.
Consider how the curve might apply to Panning automation, for example. The lower the point on the curve, the further left the audio will pan. The higher the point, the further right.
Plugins work very similarly when being automated. Let's say, for example's sake, we want to automate a single band on a multi-band Equalizer. The curve, in that case, would control that specific parameter, such as the frequency range being manipulated, or the level to which those frequencies should be manipulated. And the best part is, you can have as many automation curves as you want (or as any as your machine can handle!)
For the actual project we're working on right now, I've added an automated fade-in on one of the underlying MIDI tracks that makes up the harmonic structure of the song. It was too overpowering at the beginning, so I wanted it to slowly fade in as the beat picks up. It looks something like this...

The curve shown there gently fades the audio in after a few seconds, which sounds something like this...
And this is the same audio region with no automation, for comparison.
I hope this proves how powerful and multifunctional automation can be in keeping your tracks interesting!
Comments
Post a Comment