Plugins are additional (often third-party) pieces of software developed to work in conjunction with Ardour. However, just because they are additional pieces of software, does not mean they aren't important. Plugins do some of the most important work in defining the sound you want in your track.
In the Ardour DAW, most audio peripherals that might be analog in a standard recording studio are handled by plugins. Bass enhancers, exciters, low-pass filters, high-pass filters, and equalizers are just a few examples of important plugins you'll probably end up attaching to your tracks all the time.
Plugins allow the producer to wildly change the sound of particular audio regions. As I mentioned before, there are many types of functional plugins. Technically, however, they can be broken down into two categories.
LADSPA plugins are simple, lightweight versions of plugins that offer basic functionality. They do not have custom GUIs and simply plug directly into an interface that Ardour generates for them. LV2 plugins are full, feature-rich plugins that have custom GUIs and are designed with the user in mind. However, this means they're always heavier and put more strain on your system. For most of this tutorial, I'll be using LV2 plugins because I prefer them for their ease of use. But functionally, LADSPA plugins work just as well.
Ardour does come with a few plugins pre-installed, but most of the time you have to install them yourself, which is not particularly hard to do. Once you've got some plugins installed, it's time to add them to your tracks.
In the project we're currently working through together, I've got a number of tracks to which I want to add plugins. To start, first select a track to which you want to add a plugin. I'm going to add a Bass Enhancer plugin to our "Bass Drum" track. A Bass Enhancer does exactly what you think it does: it makes lower frequencies more prominent to make the audio regions on the track in question sound more "Bass-y."
Once you've selected your track, go to the left-most toolbar and right click anywhere in the plugin toolbar area, which is darker colored and above the fader. Then you want to click New Plugin > Plugin Manager... to open the plugin manager.
Assuming you've gone overboard and installed a lot of plugins out of sheer excitement, you're going to be overwhelmed when you open the plugin manager for the first time. But fear not, just focus on browsing and looking for the specific type of plugin you want. In this case, I'm going to choose Calf Bass Enhancer, which is made by a plugin developer that I think makes really good plugins. I like them because they work exactly how they're supposed to, they're easy to pick up, and the user interface is very good. Once you've found the plugin you want (shown below), double click it to move it to the "Plugins to be Connected" window. You can add multiple plugins at once.

Once you click "Insert Plugins" your plugins(s) will be added to your track! Often times plugins will be added post-fader on your track. Unless you have a specific reason to have your plugins routed that way, you probably want to move them pre-fader.
From this...

To this!

This is the standard way of routing plugins on a track.
Now that the plugin is connected to your track, if it's a LV2 plugin (which Calf Bass Enhancer is), you'll be shown a beautiful GUI, like this one...

You can interact with this GUI to change the parameters of your plugin. Each plugin will have different parameters and different GUIs, so there's a lot of trial and error involved here. Rest assured, you'll get the hang of it with practice!
Plugins are very flexible. You can add as many plugins as you want (or your machine can handle) to a track, but remember, the order in which you add them is important. As I touched on in the article about Routing, the routing of different audio feeds makes a big difference in Ardour. If you route audio that's been acted on by a plugin into another plugin, the second plugin will act on the modified audio coming out of the first plugin, not the original audio. This is an important thing to note.
Since we're trying to create a full project here, and we're already adding plugins, let's add a few more. If you read the article about Routing, you'll remember that in that article we sent two tracks' audio feeds into a bus so that we could apply a plugin to the bus and put a low-pass filter on both the tracks. However, we never talked about how to add that plugin to the bus itself! Let's take a look at that now.
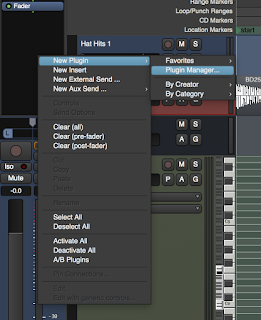
Just like before, we'll select our track. In this case, however, we'll select the bus to which we want to add our plugin. Just like before, let's navigate to the left-most control panel and right click the plugin toolbar. Then click New Plugin > Plugin Manager... to re-open the plugin manager.
This time, we'll be using a Calf 8-Band Equalizer and configuring it to work similarly to a low-pass filter. A Low-Pass Filter is a type of filter that passes over lower frequencies, allowing them to remain the same, and attenuates higher frequencies, making them less prominent. In layman's terms, a Low-Pass Filter makes high things sound less high. I want to add a low-pass filter to this bus because both high hat tracks are routed into this bus, and I think the high hats higher frequencies are very jarring. I want to diminish that screechy quality a little bit, so a low-pass filter is the perfect choice.
Below you'll see the GUI for the Calf Equalizer. I've configured one band to create a negative shelf on the higher frequencies, making it function like a quick and dirty Low-Pass Filter, shown below. This isn't exactly a Low-Pass Filter setup, because it isn't filtering out all the higher frequencies, but the functions are very similar.

This is what the Hats Bus sounded like originally...
And this is what it sounds like after having the above equalization applied to it. Notice how the higher frequencies are slightly less apparent. The sound is less "tin-y."
Equalizers like the Calf Equalizer are great because they're so versatile. You can really fine tune your sound to get exactly what you're looking for, in a very user friendly way. If you haven't used plugins before, and you are feeling overwhelmed, try experimenting with an equalizer. You'll get results quick, I guarantee it!
It would be impossible to explain every type of plugin in one article. But these basics should give you a grasp on how to use plugins, how they function, and how they can fit into your track.
If you understand Bass Enhancers (the opposite of which is an Exciter which, you guessed it, excites the higher frequencies on a track instead of boosting the lower frequencies), Low-Pass Filters and High-Pass Filters (similar to a low-pass filter, but removes bass and allows higher frequencies to pass through unchanged), and Equalizers, you're already ahead of the curve. There are also Reverb and Echo plugins, Phaser plugins, and many other plugins that you might be more intuitively familiar with.
To end this article, I'll add one more plugin to one of my MIDI tracks. Adding Plugins to MIDI tracks is exactly the same as adding a plugin to an audio track or bus. The only important thing to note (displayed below) is that I've placed my Calf Equalizer after the Calf Organ, which is my chosen software instrument for this MIDI track, but before my fader. This is the best way to route your plugins on MIDI tracks for normal plugin operation.

With this plugin, I was just experimenting with different parametric placements and curves to try to find the sound I was looking for. I ended up taking out a lot of the higher frequencies while boosting some of the middle frequencies that I thought sounded good with the surrounding harmonic structure of the song. I found all this just by trying new things and experimenting, which is a perfect mantra when it comes to working with plugins.
Here's what this MIDI region sounded like originally...
And here's what it sounds like after having the equalizer plugin attached. Notice how much the sound changes. There are far fewer buzzing higher frequencies, and the lower frequencies are highlighted, giving the region a much richer, darker sound...
Even though it seems complex and overwhelming at first, if you roll your sleeves up and get your hands dirty working with them, plugins will prove to be your closest allies in creating sick beats.
In the Ardour DAW, most audio peripherals that might be analog in a standard recording studio are handled by plugins. Bass enhancers, exciters, low-pass filters, high-pass filters, and equalizers are just a few examples of important plugins you'll probably end up attaching to your tracks all the time.
Plugins allow the producer to wildly change the sound of particular audio regions. As I mentioned before, there are many types of functional plugins. Technically, however, they can be broken down into two categories.
LADSPA plugins are simple, lightweight versions of plugins that offer basic functionality. They do not have custom GUIs and simply plug directly into an interface that Ardour generates for them. LV2 plugins are full, feature-rich plugins that have custom GUIs and are designed with the user in mind. However, this means they're always heavier and put more strain on your system. For most of this tutorial, I'll be using LV2 plugins because I prefer them for their ease of use. But functionally, LADSPA plugins work just as well.
Ardour does come with a few plugins pre-installed, but most of the time you have to install them yourself, which is not particularly hard to do. Once you've got some plugins installed, it's time to add them to your tracks.
In the project we're currently working through together, I've got a number of tracks to which I want to add plugins. To start, first select a track to which you want to add a plugin. I'm going to add a Bass Enhancer plugin to our "Bass Drum" track. A Bass Enhancer does exactly what you think it does: it makes lower frequencies more prominent to make the audio regions on the track in question sound more "Bass-y."
Once you've selected your track, go to the left-most toolbar and right click anywhere in the plugin toolbar area, which is darker colored and above the fader. Then you want to click New Plugin > Plugin Manager... to open the plugin manager.

Assuming you've gone overboard and installed a lot of plugins out of sheer excitement, you're going to be overwhelmed when you open the plugin manager for the first time. But fear not, just focus on browsing and looking for the specific type of plugin you want. In this case, I'm going to choose Calf Bass Enhancer, which is made by a plugin developer that I think makes really good plugins. I like them because they work exactly how they're supposed to, they're easy to pick up, and the user interface is very good. Once you've found the plugin you want (shown below), double click it to move it to the "Plugins to be Connected" window. You can add multiple plugins at once.

Once you click "Insert Plugins" your plugins(s) will be added to your track! Often times plugins will be added post-fader on your track. Unless you have a specific reason to have your plugins routed that way, you probably want to move them pre-fader.
From this...

To this!

This is the standard way of routing plugins on a track.
Now that the plugin is connected to your track, if it's a LV2 plugin (which Calf Bass Enhancer is), you'll be shown a beautiful GUI, like this one...

You can interact with this GUI to change the parameters of your plugin. Each plugin will have different parameters and different GUIs, so there's a lot of trial and error involved here. Rest assured, you'll get the hang of it with practice!
Plugins are very flexible. You can add as many plugins as you want (or your machine can handle) to a track, but remember, the order in which you add them is important. As I touched on in the article about Routing, the routing of different audio feeds makes a big difference in Ardour. If you route audio that's been acted on by a plugin into another plugin, the second plugin will act on the modified audio coming out of the first plugin, not the original audio. This is an important thing to note.
Since we're trying to create a full project here, and we're already adding plugins, let's add a few more. If you read the article about Routing, you'll remember that in that article we sent two tracks' audio feeds into a bus so that we could apply a plugin to the bus and put a low-pass filter on both the tracks. However, we never talked about how to add that plugin to the bus itself! Let's take a look at that now.
Just like before, we'll select our track. In this case, however, we'll select the bus to which we want to add our plugin. Just like before, let's navigate to the left-most control panel and right click the plugin toolbar. Then click New Plugin > Plugin Manager... to re-open the plugin manager.
This time, we'll be using a Calf 8-Band Equalizer and configuring it to work similarly to a low-pass filter. A Low-Pass Filter is a type of filter that passes over lower frequencies, allowing them to remain the same, and attenuates higher frequencies, making them less prominent. In layman's terms, a Low-Pass Filter makes high things sound less high. I want to add a low-pass filter to this bus because both high hat tracks are routed into this bus, and I think the high hats higher frequencies are very jarring. I want to diminish that screechy quality a little bit, so a low-pass filter is the perfect choice.
Below you'll see the GUI for the Calf Equalizer. I've configured one band to create a negative shelf on the higher frequencies, making it function like a quick and dirty Low-Pass Filter, shown below. This isn't exactly a Low-Pass Filter setup, because it isn't filtering out all the higher frequencies, but the functions are very similar.

This is what the Hats Bus sounded like originally...
And this is what it sounds like after having the above equalization applied to it. Notice how the higher frequencies are slightly less apparent. The sound is less "tin-y."
Equalizers like the Calf Equalizer are great because they're so versatile. You can really fine tune your sound to get exactly what you're looking for, in a very user friendly way. If you haven't used plugins before, and you are feeling overwhelmed, try experimenting with an equalizer. You'll get results quick, I guarantee it!
It would be impossible to explain every type of plugin in one article. But these basics should give you a grasp on how to use plugins, how they function, and how they can fit into your track.
If you understand Bass Enhancers (the opposite of which is an Exciter which, you guessed it, excites the higher frequencies on a track instead of boosting the lower frequencies), Low-Pass Filters and High-Pass Filters (similar to a low-pass filter, but removes bass and allows higher frequencies to pass through unchanged), and Equalizers, you're already ahead of the curve. There are also Reverb and Echo plugins, Phaser plugins, and many other plugins that you might be more intuitively familiar with.
To end this article, I'll add one more plugin to one of my MIDI tracks. Adding Plugins to MIDI tracks is exactly the same as adding a plugin to an audio track or bus. The only important thing to note (displayed below) is that I've placed my Calf Equalizer after the Calf Organ, which is my chosen software instrument for this MIDI track, but before my fader. This is the best way to route your plugins on MIDI tracks for normal plugin operation.

With this plugin, I was just experimenting with different parametric placements and curves to try to find the sound I was looking for. I ended up taking out a lot of the higher frequencies while boosting some of the middle frequencies that I thought sounded good with the surrounding harmonic structure of the song. I found all this just by trying new things and experimenting, which is a perfect mantra when it comes to working with plugins.
Here's what this MIDI region sounded like originally...
And here's what it sounds like after having the equalizer plugin attached. Notice how much the sound changes. There are far fewer buzzing higher frequencies, and the lower frequencies are highlighted, giving the region a much richer, darker sound...
Even though it seems complex and overwhelming at first, if you roll your sleeves up and get your hands dirty working with them, plugins will prove to be your closest allies in creating sick beats.
Comments
Post a Comment